Documenting Your Media Ministry Setup
Introduction:
As a media ministry leader, having an organized and well-documented setup can make all the difference in your day-to-day workflow. In today’s post, I’m excited to walk you through my current media ministry setup—sharing all the details on how I manage my equipment, cameras, computers, and more. Whether you're setting up your own media ministry or just looking to refine your existing setup, these insights will help streamline your operations and boost your efficiency.
Video Overview:
In the latest video, I take you behind the scenes to give a complete overview of my media ministry setup. From cameras to streaming PCs, we’ll dive into how everything is connected and organized. This step-by-step documentation ensures that if anything needs troubleshooting or upgrading, I know exactly where to look. It's a best practice I highly recommend for any media ministry team!
Here’s a breakdown of what you can expect from the video:
1. Camera Setup
My setup includes five different cameras strategically positioned for various angles and functions. These include the Famco PTZ, Blackmagic Micro Cinema Camera Gen 2, PTZ Optics Move SE, SMT AV 10x, and BZB Gear PTZ. Most of these cameras are AI tracking-enabled, which makes them highly versatile for capturing live events seamlessly. This multi-camera setup gives me the flexibility to cover every angle without needing to reposition gear constantly.
2. Streaming and Editing Computers
I currently use two PCs for streaming and editing. The main PC runs vMix, which handles my core streaming tasks, while the second PC uses OBS for various projects. By using multiple computers, I can separate functions, minimizing the load on any one machine. I also rely on HDMI splitters and Decklink Mini Monitors for feeding my live streams into these machines. If you're serious about live streaming and want high-quality production, I recommend using fiber optic HDMI cables for better reliability over long distances.
3. Audio Integration
Audio quality is just as important as video. For my setup, I use the Rodecaster Pro 2, which sends audio directly to my ATEM switch via quarter-inch cables. This integration ensures clean and professional audio for all my recordings and live streams. The Rodecaster also simplifies audio control, which is especially useful when I take phone calls or integrate other audio sources during a stream.
4. Managing Inputs and Outputs
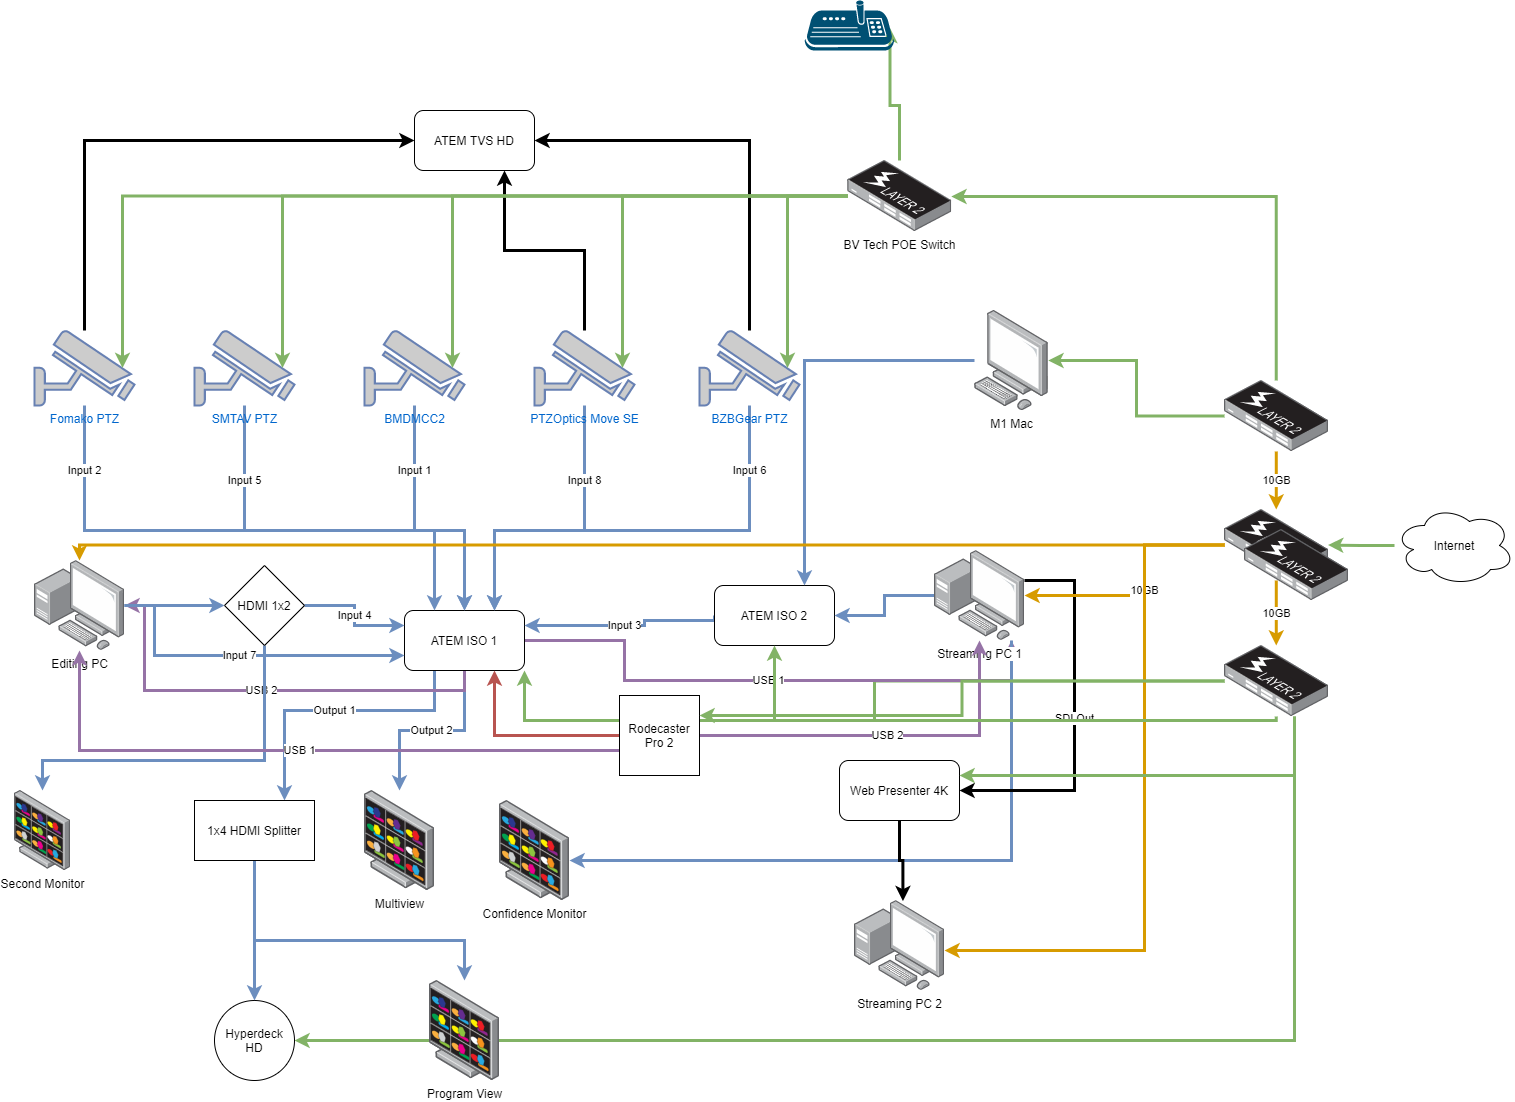
With multiple cameras, monitors, and computers in play, managing inputs and outputs can get complicated. To simplify this, I’ve organized everything using HDMI splitters and a Decklink Mini Monitor HD, which allows me to easily switch between sources. Having a visual representation of your setup—like the diagram I created in the video—can help tremendously with troubleshooting and future upgrades.
5. The Importance of Documentation
One of the key takeaways from this video is the importance of documenting your setup. I've created a detailed diagram using draw.io (or diagrams.net) to map out how every piece of equipment is connected. This is crucial for troubleshooting issues quickly and efficiently. Whether you're adding new devices or reorganizing your existing setup, having documentation will save you time and headaches down the line.
Conclusion:
In a fast-paced media ministry environment, having a well-documented and organized setup is essential for smooth operations. I hope this behind-the-scenes look at my setup gives you some ideas on how to improve your own. If you're just getting started, take it step by step—start by documenting your current setup, and make adjustments as you go.
Want to see my setup in action? Watch the full video [here] and stay tuned for more tips on how to elevate your media ministry!
Thanks for reading, and don't forget to subscribe for more content on media ministry best practices!

